Wednesday, September 30, 2009

At last! - The Final Grow Bed Is Leak Free...

Just over five months from the day I started ripping the swimming pool liner from its depths, the fourth grow bed is holding water and ready for its place among the useful. After a 24 hour testing period in which the bed was filled partially with rock and then filled with water, the ground beneath the bed is still dry. No leaks in the new liner and the drain bulkhead is perfectly sealed.

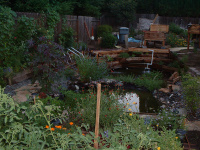
Now it's time to clean the rock, which will be a few day process. The water from the cleaning process will be used to irrigate the garden and other yard areas. Since I don't want to flood the yard, I'll have to do it gradually. I simply hook up a hose to the auto-siphon drain and direct the water to different areas of the yard. This will be the first rock that I am going to thoroughly clean. I feel it necessary with the system running great and the water is looking good. I don't want to disrupt the cycle by introducing a week of cloudy water for the algae to feast on. With the first two grow beds I didn't clean the rock at all. It takes so much water to clean it, I couldn't justify wasting it at the time. With the third bed I partially cleaned it by filling the bed with water and draining it twice. I am going to do the same with this last bed, except I am going to fill and drain it about 20 times.

Grow bed without and then with the liner...


Some areas of concern with regards to leaks...

When constructing the bulkhead for the auto-siphon I had previously been putting the bulkhead on to the liner and then filling the bed with rock. The problem is once I started putting the rock in, the liner would adjust itself and the bulkhead would end up in a slightly different position. I would then have to try to stretch liner so the bulkhead and the drain hole would line up properly. Once filled with rock, the liner does not move. Stretching it was causing the bulkhead to leak. So this time, I partially filled it up with rock first, making sure all the corners and edges had plenty of weight. This would make sure the liner was fully in place and would not adjust later. I marked the position of the drain hole for the bulkhead. I then moved the rock out of the way and proceeded with the bulkhead construction. It worked like a charm.


Filling it up and testing for leakage...


Clean the rock by filling the bed with water, then draining it. Repeat many times...


It is time to locate some fish!

Monday, September 28, 2009

Drain Bulkheads For The Auto Siphon

I have had success with two very simple self-made bulkheads for the auto-siphon drain assembly. They both have worked well, that is, when they were properly constructed.

The first assembly works better for rubber liners.


I used this assembly for the plastic liner.


The procedures for each will be laid out at the new "step-by-step" blog. I am working on the details and want to be as thorough as possible before I start posting there. You can get a good idea of how to assemble them from the above images. The important thing to remember is not to cut a hole in the plastic liner(assembly #2) until after the adapters have been joined. Just screw them together from each side and the liner will stretch around the threads, making a perfect seal. Oh, and use plenty of silicon, you won't be able to screw the adapters together without it.

Thursday, September 17, 2009

The Dog Days of Summer...

Had a couple of days of nice weather but now it's back to the summer-like heat in the upper 90's. Was nice to get a lot of work done on the 2 nice days we had, working about 12 hours each day. Unfortunately summer just does not want to go away just yet.

Anyway, I made some good progress and should be ready for fish when I can find a local supplier. It's not as easy as you would think to get Bass and Catfish for a backyard pond. There are not too many places you can get live fish, and the places to get them are usually far away. I'll figure it out because more Goldfish are not an option for this project.

Some areas of completion over the last couple of weeks...

The third grow bed is fully functional. I put a few plants in it just so it doesn't look totally void of growth.


The North-East walkway is complete. I just need to put some plants on the borders for a better appearance.


And a couple of things I am working on...

Garden cleanup and Autumn planting time. This has nothing to do with the pond project, except it takes a lot of my time away from it.


The last grow bed. All I have to do is replace the liner, make a bulkhead for the auto-siphon, and then fill it with the rock I just purchased for it. The rock is going to be a pain in the ass because this bed is much higher than the other large bed. Definitely will have to wait for a cooler day, which, according to the local weather forecast, doesn't look anytime soon. The area below and behind the bed is the last area in need of landscaping. That will wait until after the system is fully functional because it will be a project onto itself.

Friday, September 04, 2009

September Happenings

I finally fixed the leak in the third grow bed. I just need to trim the liner and fill it with rock. One more to go!


Even without the grow beds all functioning, the water has cycled well and is ready for some large fish. The smaller pond is full of many types of goldfish and won't need any more.


The large pond has just a few common goldfish and is awaiting some Catfish, Bluegill, and Largemouth Bass. The underwater plants in this pond are thriving as you can see in this photo.


Almost done with the final retaining wall and steps on the north-east side of the pond area.


Well, that is about it for now. I'll be trying to work on my other blog that will have step-by-step details on how I did everything soon. I was going to wait until I was completely done before starting the instructions for that blog. But I am so far behind that I am just going to start it anyway.